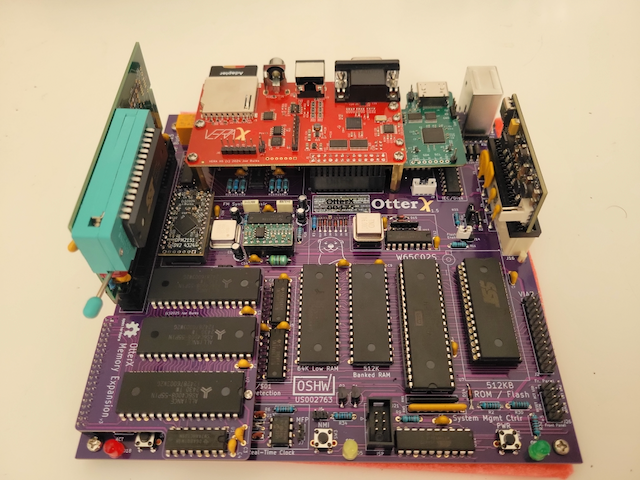
The OtterX is a remarkable little machine! It’s meant to be a modern take on the classic Commodore 64. This system was designed by Joe Burks as an affordable, Mini-ITX alternative to the Commander X16. It is a true 8-bit enthusiast’s dream, balancing the limitations of the past with the convenience of modern production.
At its core, the OtterX is powered by a Western Design Center 65C02 CPU running at a standard 8MHz, though the board is engineered to support an upgrade to the 16-bit 65C816. Should you want to switch between the base CPU or the optional upgraded CPU, there is a CPU switcher that can be purchased as an extra add-on. This gives the user the option of using the 65C02 CPU or swapping to the more powerful 65C816S CPU rather easily and gives you access to both instead of only having one. While you don’t need to purchase this switcher, the base CPU can be overclocked to 10MHz.
The system follows a Mini-ITX form factor, making it uniquely compatible with standard modern PC cases while maintaining its retro soul. Its connectivity is impressively versatile, featuring dual SNES-compatible controller ports, PS/2 connectors for a keyboard and mouse, and a Commodore IEC-compatible serial port for legacy peripherals like the 1541 disk drive, though like the CPU switcher, this is an optional purchase.

While the base system comes with a respectable 512KB of High RAM and 40KB of Low RAM, the memory expansion module (often referred to in the community as the “expansion chip” or kit) allows users to push the system to a full 2MB of RAM. This upgrade is essential for running more complex software and modern homebrew that demands higher banking capabilities.
Installing the module is a matter of inserting it into the port that has the label for it, and then the movement of jumper J27 on the motherboard to “Enable” the additional memory, ensuring the system can map the extra banks correctly for the CPU. While the memory expansion module isn’t needed for any games or software currently available, it’s nice to have just in case you want the piece of mind knowing that it’s there in case there is an app or game you want to run that needs it, or in the event you write your own software that makes use of it.
Graphics are handled by the VERA (Versatile Embedded Retro Adapter) card, which provides quite a few video output options. The options offered for video output are VGA, S-video, and Composite. Included with our press unit, we were provided an HDMI daughterboard which allows the OtterX to output using standard HDMI. It’s important to note that the HDMI support is still in it’s prototype phase and is under active development and finalization. One issue with the HDMI prototype board, is that with it connected, you can’t use any of the optional daughterboards as the ports for them are blocked with it connected under the VERA. Despite these limitations and the fact it’s a prototype, the end results so far are pretty spectacular. For those that don’t want to dive into the unknown with the state of the HDMI option, the next best option is the high-quality VGA output.

VGA is going to be the best option for most people in this day and age. For those that don’t have a means to use VGA, you could use a VGA to HDMI adapter. You would take the adapter and connect one end into the VGA port, the audio cable into the onboard 3.5mm audio jack, then take the HDMI cable from your display and put it into the HDMI connector. The only downside to this configuration is that it needs external power through USB.

Performance-wise, the OtterX is flawlessly compatible with Commander X16 software, delivering a smooth, tear-free experience that feels more like a “super-powered” Commodore 64 or Apple II. Because it uses modern components and a clean PCB design, it avoids the reliability issues often seen in original 80s hardware while maintaining that authentic, cycle-accurate 8-bit response time. For an 8-bit computer that can do both 8-bit and 16-bit graphics, it is a really impressive

The sound design on the OtterX is exceptional, centered around the OPM2151, which serves as a modern drop-in replacement for the Yamaha YM2151 FM synthesis chip. This allows the machine to produce the same iconic, multi-timbral FM sounds found in classic arcade cabinets and the Sega Genesis. Coupled with the VERA card’s own internal audio channels for PCM playback, the system produces a layered, professional soundscape that far exceeds the “bleeps and bloops” of earlier 8-bit eras, making it a favorite for chiptune composers and retro gamers alike.
Now that we have taken a look at the OtterX itself, let’s take a look at some of the optional accessories that Joe was able to send us as a part of this review. In addition to the OtterX, we were sent the Memory Expansion module, of which we touched on as well as the HDMI daughterboard prototype.
Some additional things that he sent besides those were an additional two SNES controller ports in the form of a daughterboard, a daughterboard to support disk drive and printer device support, a ROAM cartridge, and a Calypso board.

The SNES daughterboard gives you an additional two controller ports so that you could play with up to four SNES controllers at once, though there aren’t many games and apps that support four controllers, it’s nice to have the option should you need more than two. The daughterboard that supports the connection of disk drives and printers designed for use with the C64 is a nice optional accessory.
While I appreciate the inclusion of this daughterboard, I was not able to test it’s functionality at the time of this review as I don’t have any accessories to test it with.
While the controller board and the IO board provide some good optional use cases, the real big accessories we were provided are the Calypso board and the ROAM cartridge.

The Calypso board offers two standard USB boards for USB keyboards, mice, and should also support mass storage devices (at the time of this review, it has not been tested). In addition to the USB ports, it also supports WiFi connection to a network for file transfer and connection to BBS boards online (though this requires a serial termination. Serial port for termination was not included in this build). While the Calypso offers two standard USB ports and the ability to transfer files wirelessly, there are some limitations between the OtterX and the Calypso.
The limitations of the OtterX and the Calypso is that with the Calypso connected, it can’t use the SD card on the VERA. So you have to use the micro SD card slot on the Calypso. Another limitation is that with the Calypso connected, you are forced to use one of the video connections provided by the VERA board. Because of the way the Calypso connects to the OtterX, you can’t use the HDMI daughterboard (this is being worked on to allow them to both work).

One of the other top accessories Joe sent with this unit is the ROAM cartridge. Without getting into the technical side of this cartridge, it’s a development cartridge. This cartridge allows programs to be written to it and loaded from the cartridge slot. This allows them to be automatically loaded without manually having to use a command to run them. In addition to being automatically loaded, apps and games can take advantage of the additional RAM the written apps can access on the cart for better performance and compatibility.
Conclusion
The OtterX is more than just a clone; it is a thoughtfully re-engineered “what if” machine that perfectly bridges the gap between 1984 and 2026. Its focus on the Mini-ITX standard and through-hole assembly makes it one of the most accessible DIY kits for anyone looking to build their own computer from the ground up. Whether you are a developer looking to push the limits of the ROAM cartridge or a gamer wanting to experience the burgeoning X16 library, the OtterX offers a polished, powerful, and deeply satisfying retro experience.
Disclaimer: A review unit was provided

In addition to writing articles, Ryan Byers also creates content for his YouTube channel called "Obscure Games and Consoles", collects video games, and dabbles in video game development.